The algorithm
The Wave Function Collapse algorithm originates from quantum mechanics where the system (Wave Function) consists of the many states superposition. When one element of the system collapses (its state becomes known) it affects the whole Wave Function reducing the amount of available states for other elements. In Computer Science the idea is almost the same.
Modules Construction
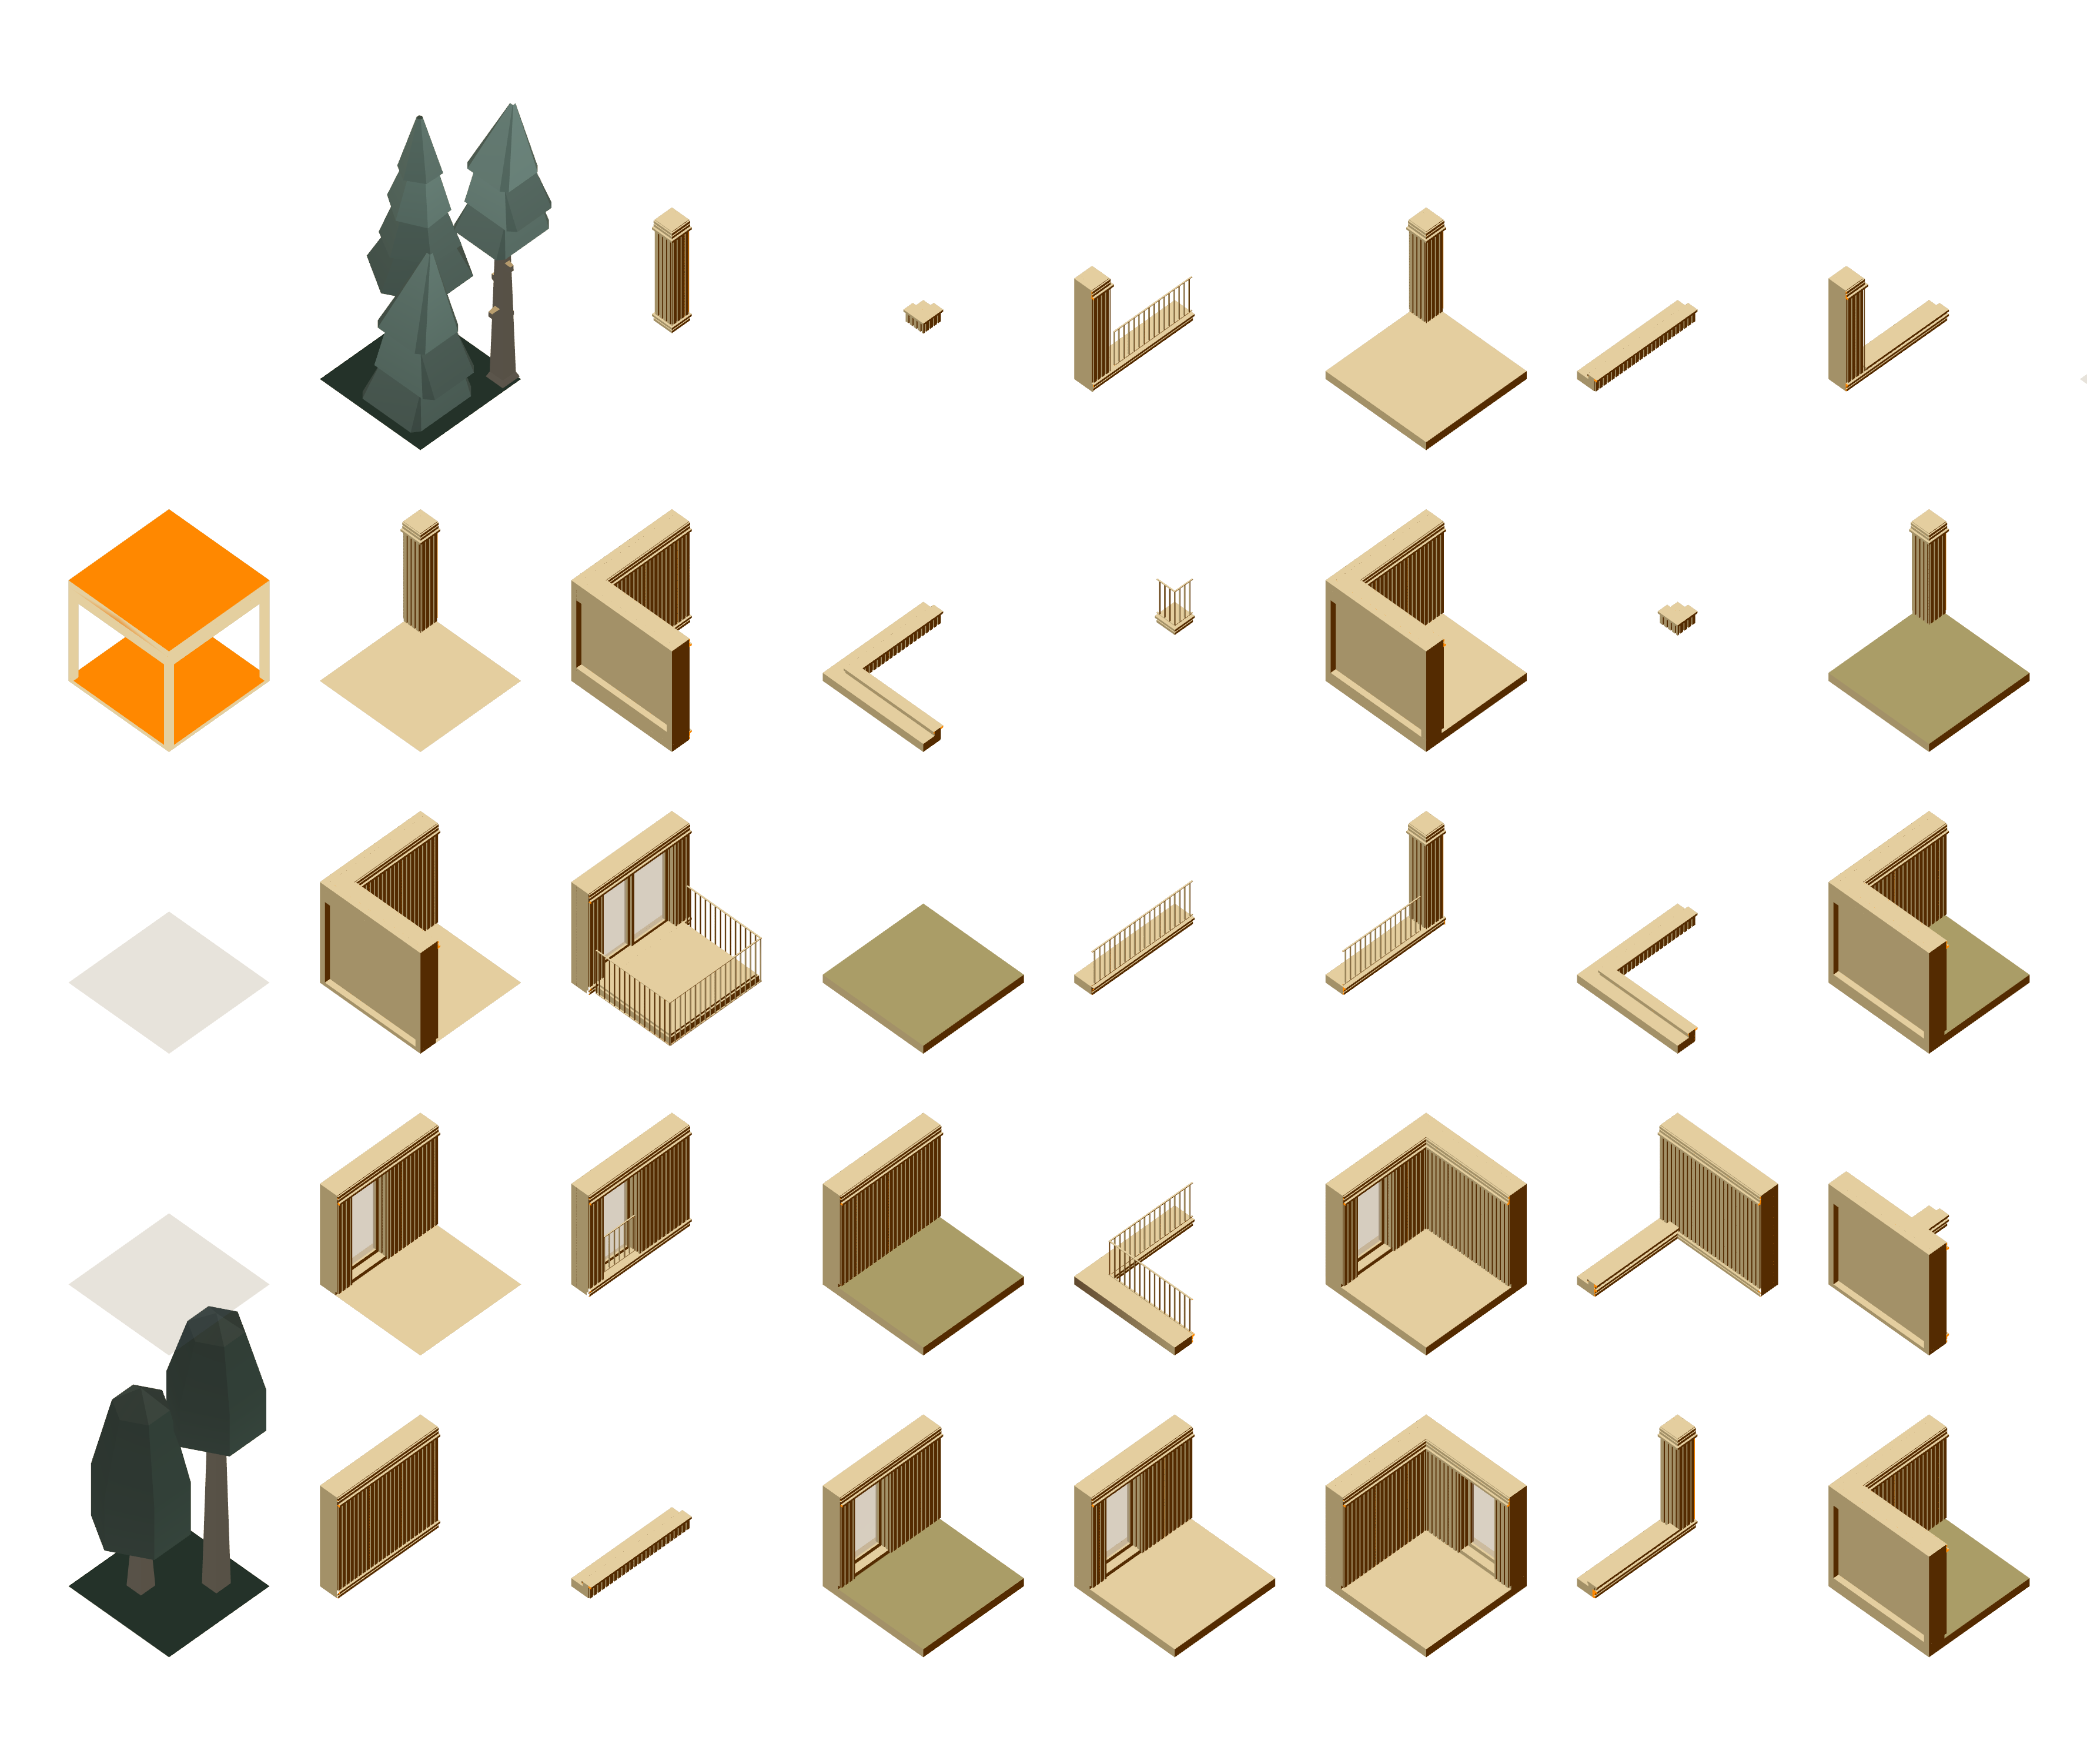
The Wave Function here is a matrix (usually 2D or 3D) of tiles or voxels. We are interested in 3D here. Before starting the algorithm it is necessary first to prepare set of the voxels which have the same size. This step is usually done in 3D modelling software and then imported into the game engine. During the modelling the building structure as well as the facade appearance needs to be designed. With these basic building blocks we can later build many different 3D configurations.
Setting up connection rules
The enumerated connectors are used to make the neighboring rules for the voxels. Each block has 4 horizontal connectors and 2 vertical. Two voxels can be placed next to each other if their connector numbers match
There's also a way to restrict two voxels from being neighbors even when their connectors match. This step is usually manual and requires a good understanding that blocks do not belong together.


Collapse
Having voxels and rules for them the actual generation algorithm takes its turn. The system starts in a state where any voxel is possible at any position. One by one, every element of the system is collapsed - the random voxel is picked from the set of all possible options at the selected position. The position is not completely random, each step the algorithm searches for the coordinates at which the least amount of choices exists.
Let's go through that with an example. We are just beginning to collapse so it's the first step. Every position has the same amount of choices so we randomly select position (x=5, y=6, z=7). Imagine that we've picked a wall voxel. After each collapse step comes the propagate where the amount of options for the surrounding tiles got limited based on the possible connections. In our example outside of the wall can be only one of the air voxels and at the sides - only other types of the wall voxels. At our next step we want to collapse further but this time we will have one or more possitions with less choices then others. And so on we continue until every element has a single state. If at some point we find a conflict we have to go few steps back and try again with some different choice.
On the picture there's another example when the algorithm is in the middle of generation process and chooses which wall voxel to select from 3 available options.


Procedural Environment Generator (WFC)
Procedural Environment Generator (WFC) is the Unreal Engine 4 plugin for professional users. It implements the WFC algorithm in a user-friendly way and is completely rewritten and significantly optimized comparing with the initial WFC implementation by Maxim Gumin.
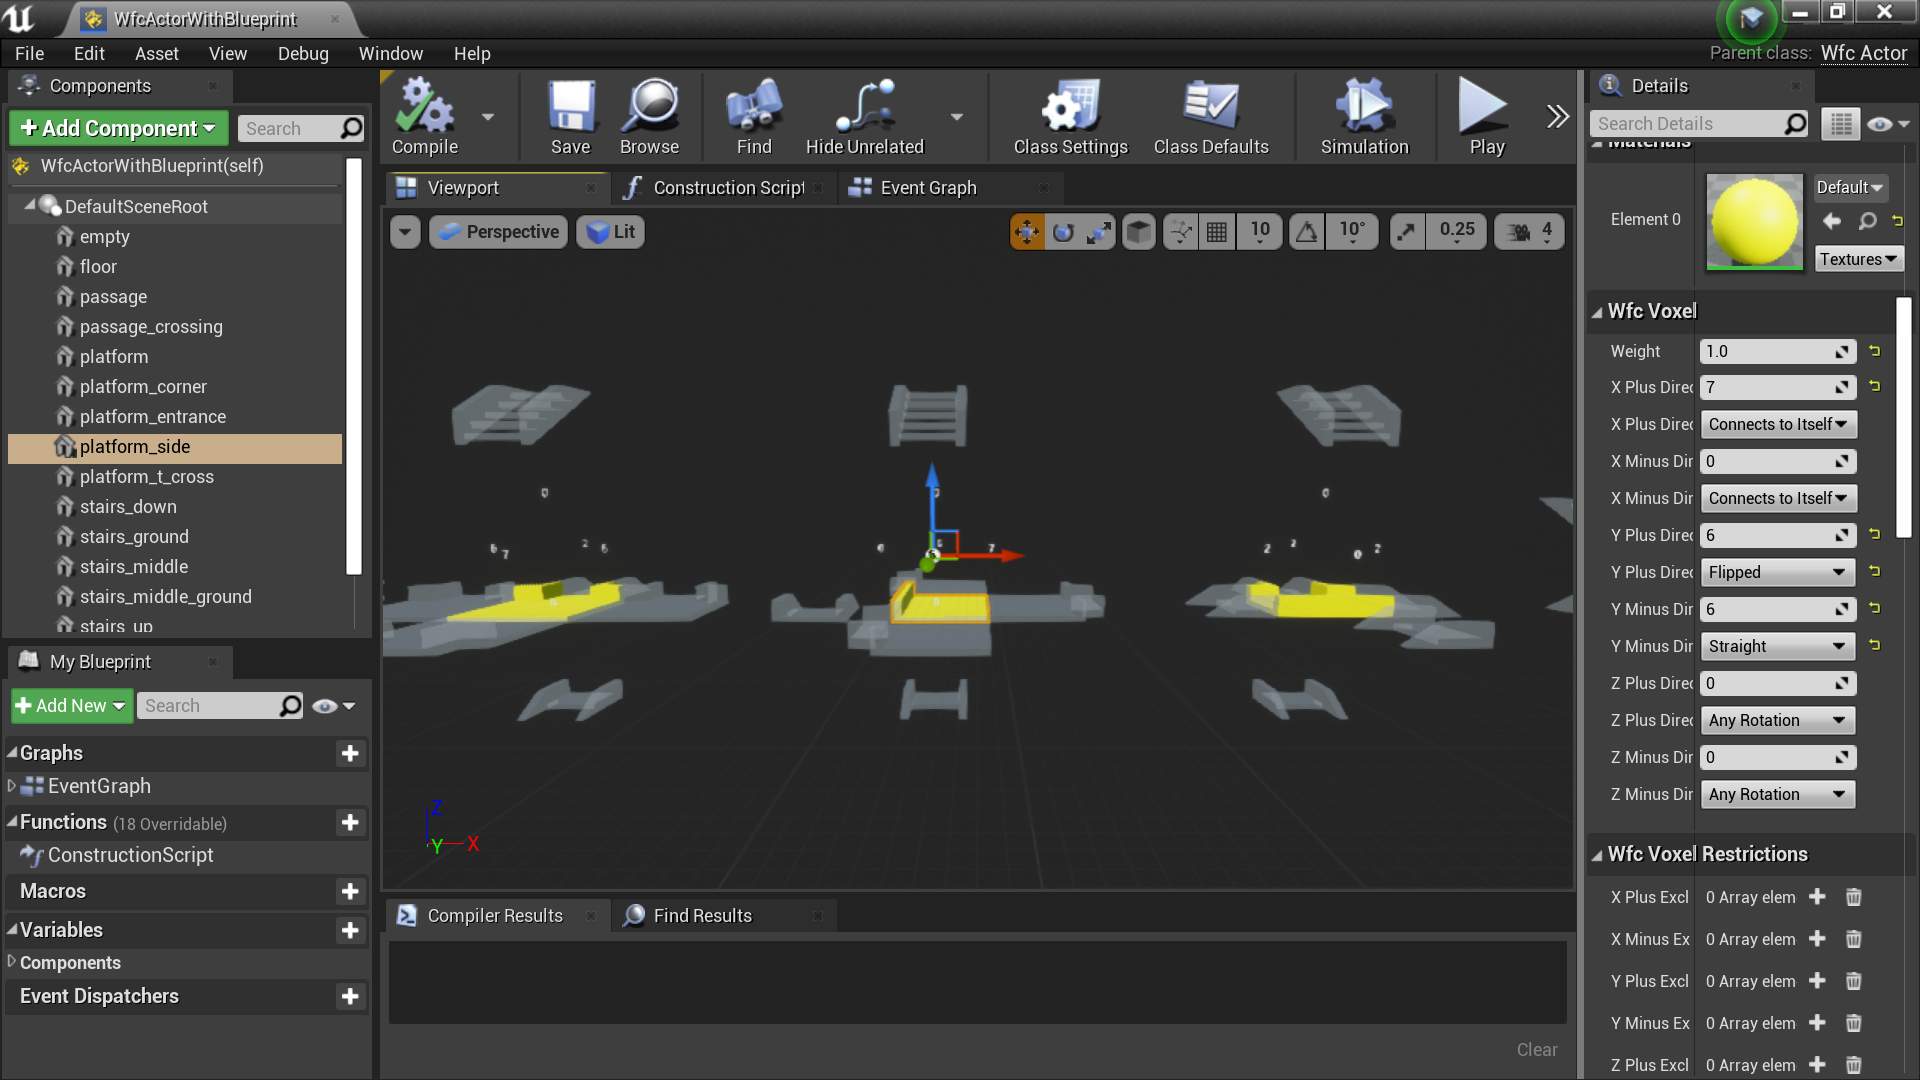
The connection rules are set up in WfcActor blueprint together with other settings:
- "Generator" properties of WfcActor:
- "X", "Y", "Z" are the dimensions of the generated level.
- "Ground" is set to the name of WfcVoxel which will be used for the whole 0 floor. Empty field means no restrictions. In the example it's set to "solid".
- "Floor Border" - restriction for the 1 floor edges (only for 1 voxel from the border). Empty field means no restrictions. In the example it's set to "floor".
- "Air Border" - restriction for all floors except 0 and 1 (only for 1 voxel from the border) and for the whole top floor. Empty field means no restrictions. In the example it's set to "empty".
- "Voxel Size" is the size of your mesh side. It is set to 200 which is the size of the mesh used in example.
- "Last Seed" shows you the seed used to generate the last level. Save it and use in "Seed" field to recreate you level.
- "Seed" field should be empty most of the time unless you want to recreate the level you generated earlier.
- "Shadow Material" is used to replace the Element 0 material. It is used only to show the connected meshes (hints) in Blueprint. Don't set it if you don't want to see connected meshes.
- "Generate in Play Mode" - select it to see interactive level generation after you press the Play button.
- WfcActor contains a set of WfcVoxels (based on UStaticMeshComponent class), each of them has additional properties split in 2 groups:
- "WfcVoxel" properties:
- "Weight" helps to adjust the frequiency of the mesh in level, has to be >= 1.
- "X/Y/Z Plus/Minus Direction" is the number of connector used at this direction.
- "X/Y Plus/Minus Direction Symmetry" has 3 values:
- "Connects to Itself" means that this connector is symmetric.
- "Straight" connects only with "Flipped" with the same number and vice versa.
- "Z Plus/Minus Direction Symmetry" has 5 values:
- "Any Rotation" is self explanatory.
- "Rotate
Times" means that this voxel connects in this direction only when it's rotated T times. For example when first WfcVoxel has "Z Plus Symmetry" = "Rotate One Time" and second - "Z Minus Symmetry" = "Rotate Three Times" that means that the first one has to be rotated twice to match be connected to the second one.
- "WfcVoxel Restrictions" properties:
- "X/Y/Z Plus/Minus Excluded" - names of other WfcVoxels (neighbors) that you don't want to be connected to this one in this direction, even if their connectors match.
- "WfcVoxel" properties:
Setting up your new Blueprint:
- Place "WfcActor" to your level
- Press "Blueprint/Add Script", select the name.
- Open Blueprint editor. Change the settings (see 4-8).
- Set "Shadow Material" for the root object (if you want to see the shadows). You may use "shadow" material from the "Demo" content.
- Set dimensions and other settings of WfcActor in "Generator" properties tab.
- Add "WfcVoxel" components to the DefaultSceneRoot.
- Set up weights, connectors and excluded neighbors.
- Do not set any mesh to the WfcVoxel if you want it to be empty (air for example).
- In Unreal Editor (NOT in Blueprint editor) press "Generate in Editor" to generate your level.
- The set of new actors will be spawned each containing the mesh you've set up earlier.
- You can clean them with button "Clean Generated". Or save "Last Seed" if you want to generate the same level later.
- To generate the same level again - paste your saved seed into "Seed" property and press "Generate in Editor".
- If you want to see interactive generation you have to set "Generate in Play Mode" and press play button.
Blueprint functions:
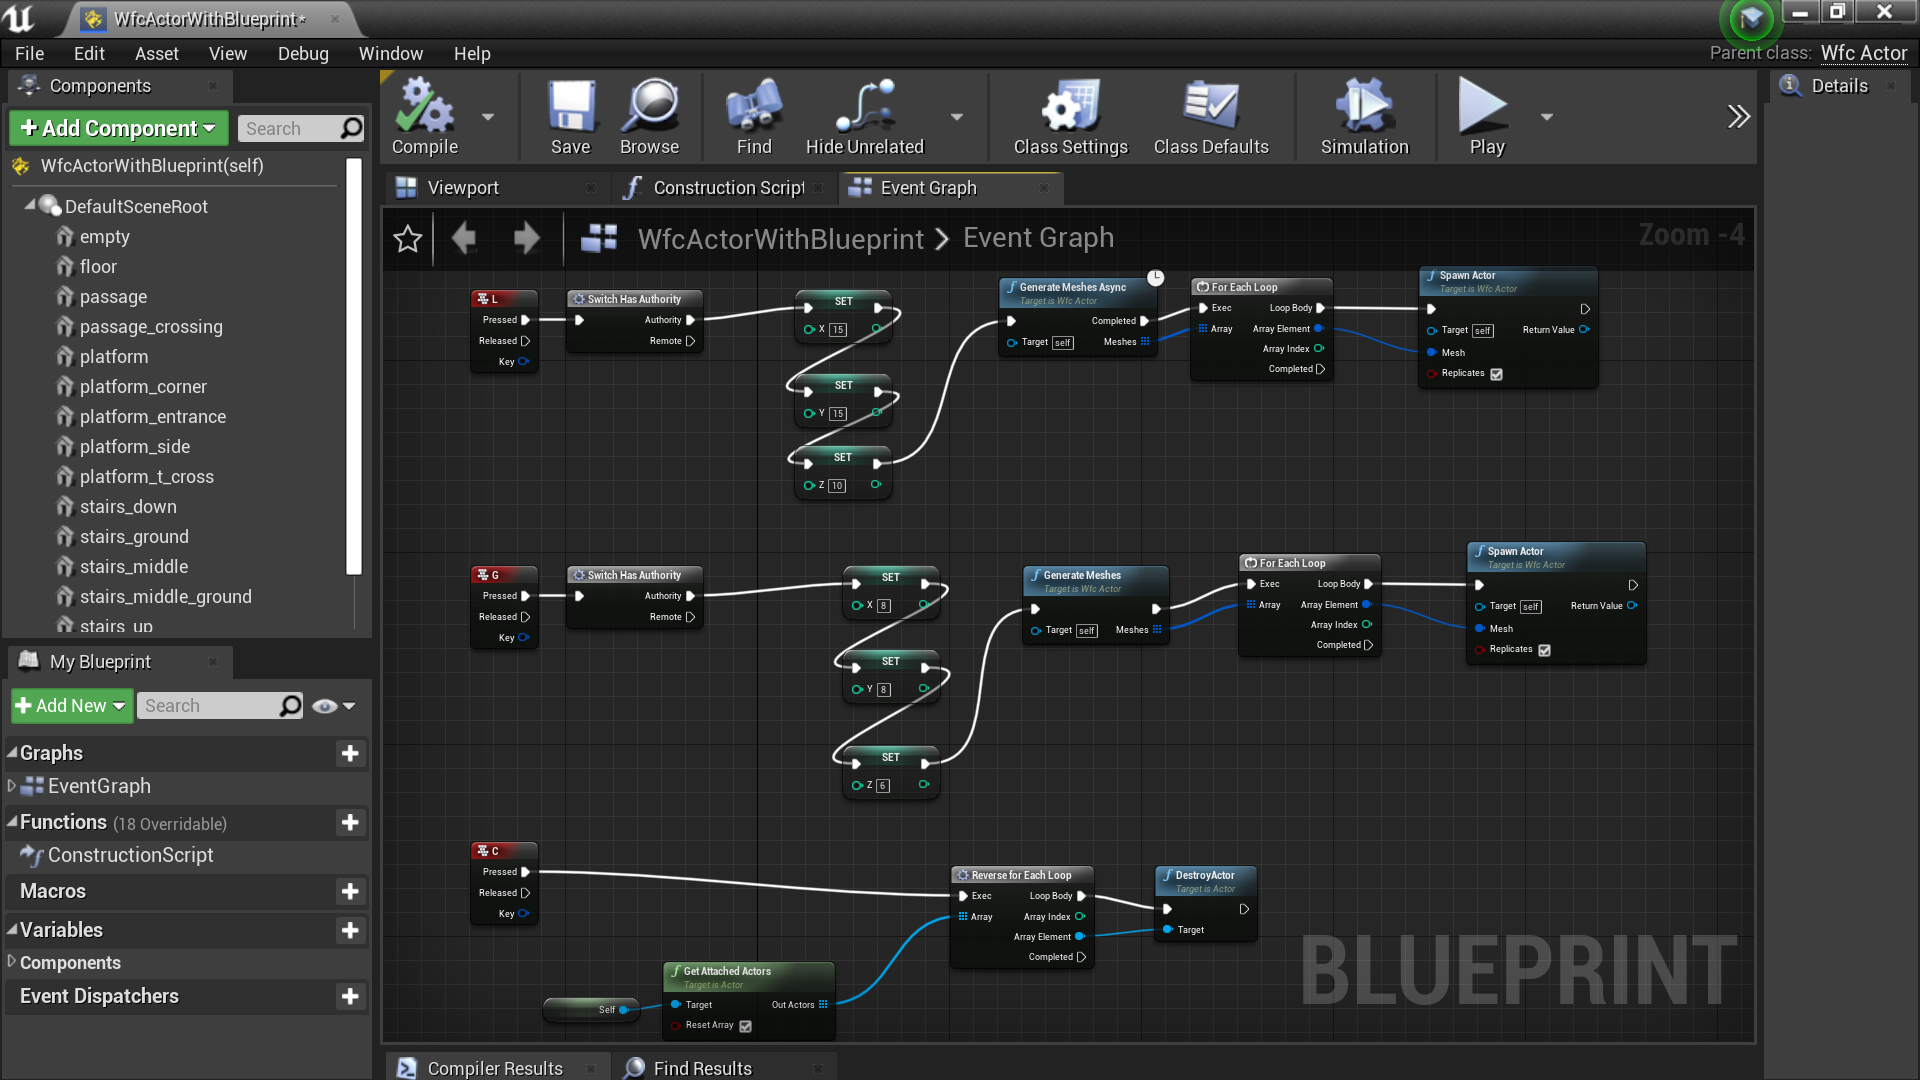
For generation at any time there are "Generate Meshes" and "Generate Meshes Async" blueprint functions which can be used together with "Spawn Actor". WfcActorWithBlueprint from the Demo content now has examples in EventGraph how to generate meshes and spawn them. To generate synchronously - press "G", to do that in background - press "L". Clear everything by "C".
Procedural Environment Generator Lite
TBW